Guardrails
Review how each guardrail is performing — fire rates, compliance trend and false positives — and set its name, category and priority
Guardrails are the safety and compliance checks AskRAI runs over an interaction. This page is where you review how they are performing — how often each one fired, against what, and how many of those were false positives — and where you set a guardrail's name, description, category and priority.
What a guardrail actually does is defined elsewhere. Its kind, the stage it reads, the action it takes and whether it is Active all live on the Settings → Guardrails page, which is also where guardrails are now created. Every editor here links there with Edit in Settings. See Guardrails (concept) for what those three decisions mean.
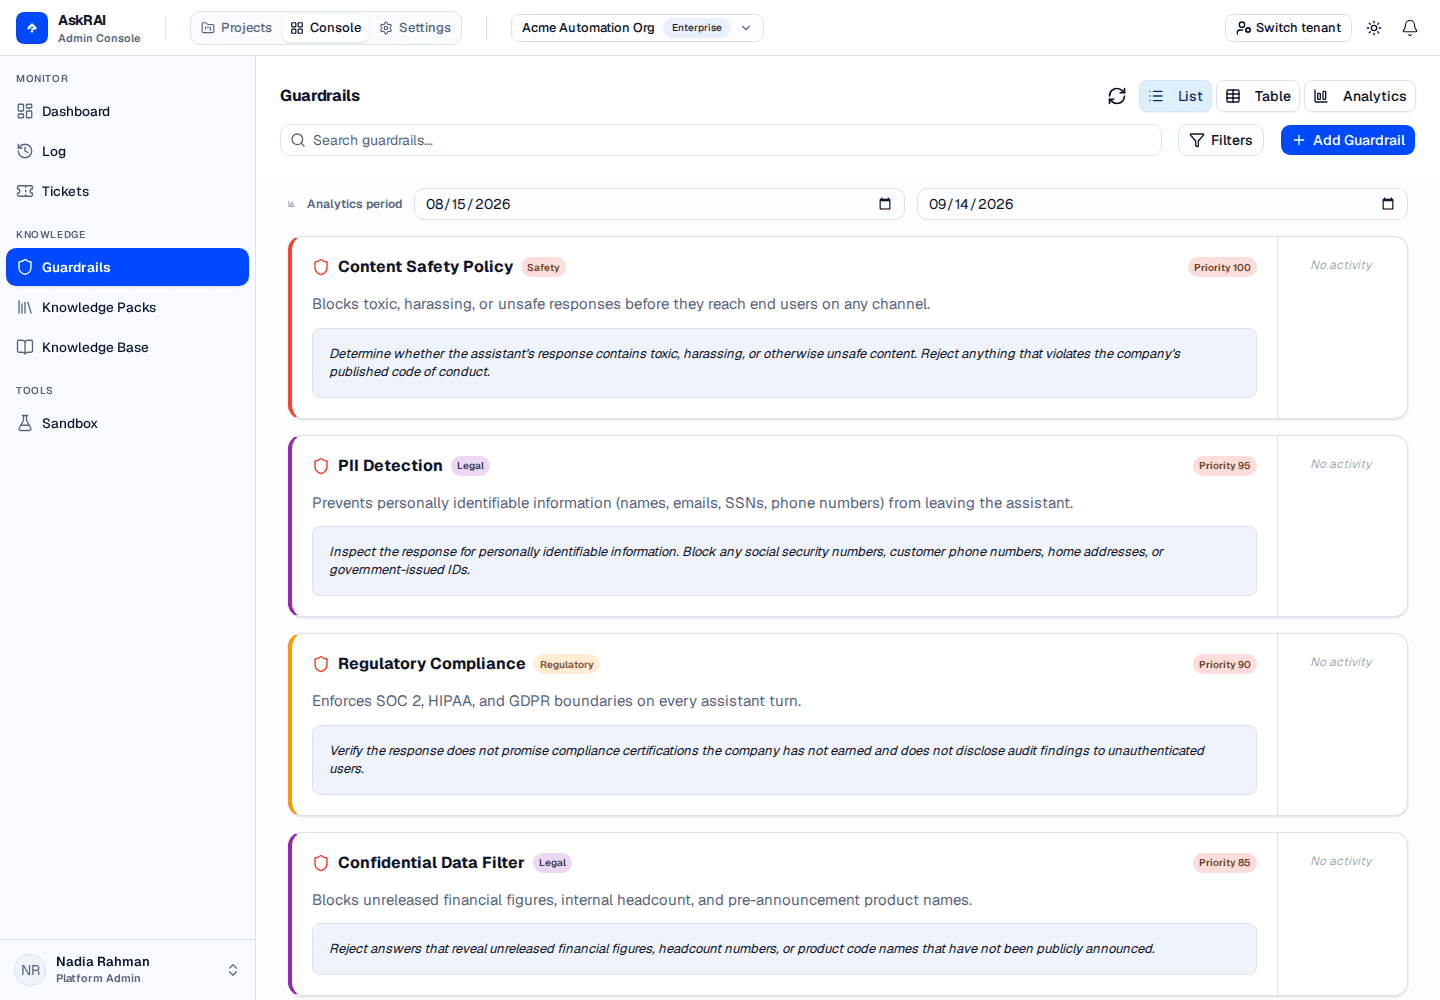
Each card carries the guardrail's category, its priority and a preview of its prompt — the fields this page owns.
What this page can and cannot change
| Field | Where it is set |
|---|---|
| Name, description, category, priority | Here. Settings authors name and description, but sets category and priority for you — Custom and 5 — with no control to change them |
| Kind, stage, action, status, judge model, per-kind configuration | Settings → Guardrails only |
| Which groups or agents a guardrail governs | The group, the agent, or a policy |
A guardrail that nothing lists screens nothing, for anyone. Guardrails are attached to a subject, never applied tenant-wide: a person's guardrails come from their groups, an agent's from the agent. This page has no attachment control. To put one into effect, add it to a group under Settings → Users → Groups (see Users, Roles & Groups), to an agent on the project's Team pane, or to a policy attached to either.
How the guardrails on this page behave at runtime
- Six kinds, five of them free. PII, regex deny, word deny, secret scan and link domain are evaluated in code and cost no model call. Only an LLM judge reaches a provider — and only a judge has a prompt.
- Three stages. A guardrail reads the user's question (Input), the generated answer (Output), or the arguments an agent is about to send to a tool (Tool call). A rule about how answers should be worded belongs on Output.
- Three actions. Block stops the turn, Warn lets it continue and leaves a record, Redact substitutes what it found and continues. One blocking guardrail is enough — there is no majority rule.
- Priority is evaluation order. The deterministic kinds run one after another in priority order, and the first one to block is the one reported as the reason. Judges run afterwards, at most three at a time. Once something has blocked, only the judges that would also Block are skipped — a Warn judge still runs, so it keeps firing on exactly the turns it was attached to watch. (A judge cannot be set to Redact: it returns a verdict, not the position of what it objected to.)
- Audit recording. Every evaluation, pass or fail, is recorded and counted in the analytics. No setting reduces this.
- Only Active guardrails run. A draft is listed and attachable and evaluates nothing. The status badge is in the editor here; the status itself is set in Settings.
Viewing guardrails
Three view modes, switchable from the toolbar:
- List view (default) — a card per guardrail with its name, category badge, priority chip, a preview of its prompt, and a fire badge.
- Table view — columns for name, description, category, priority, reporting level, fire count, fire rate and a sparkline trend.
- Analytics view — a compliance trend line, a category distribution breakdown, and a top-fired guardrails chart.
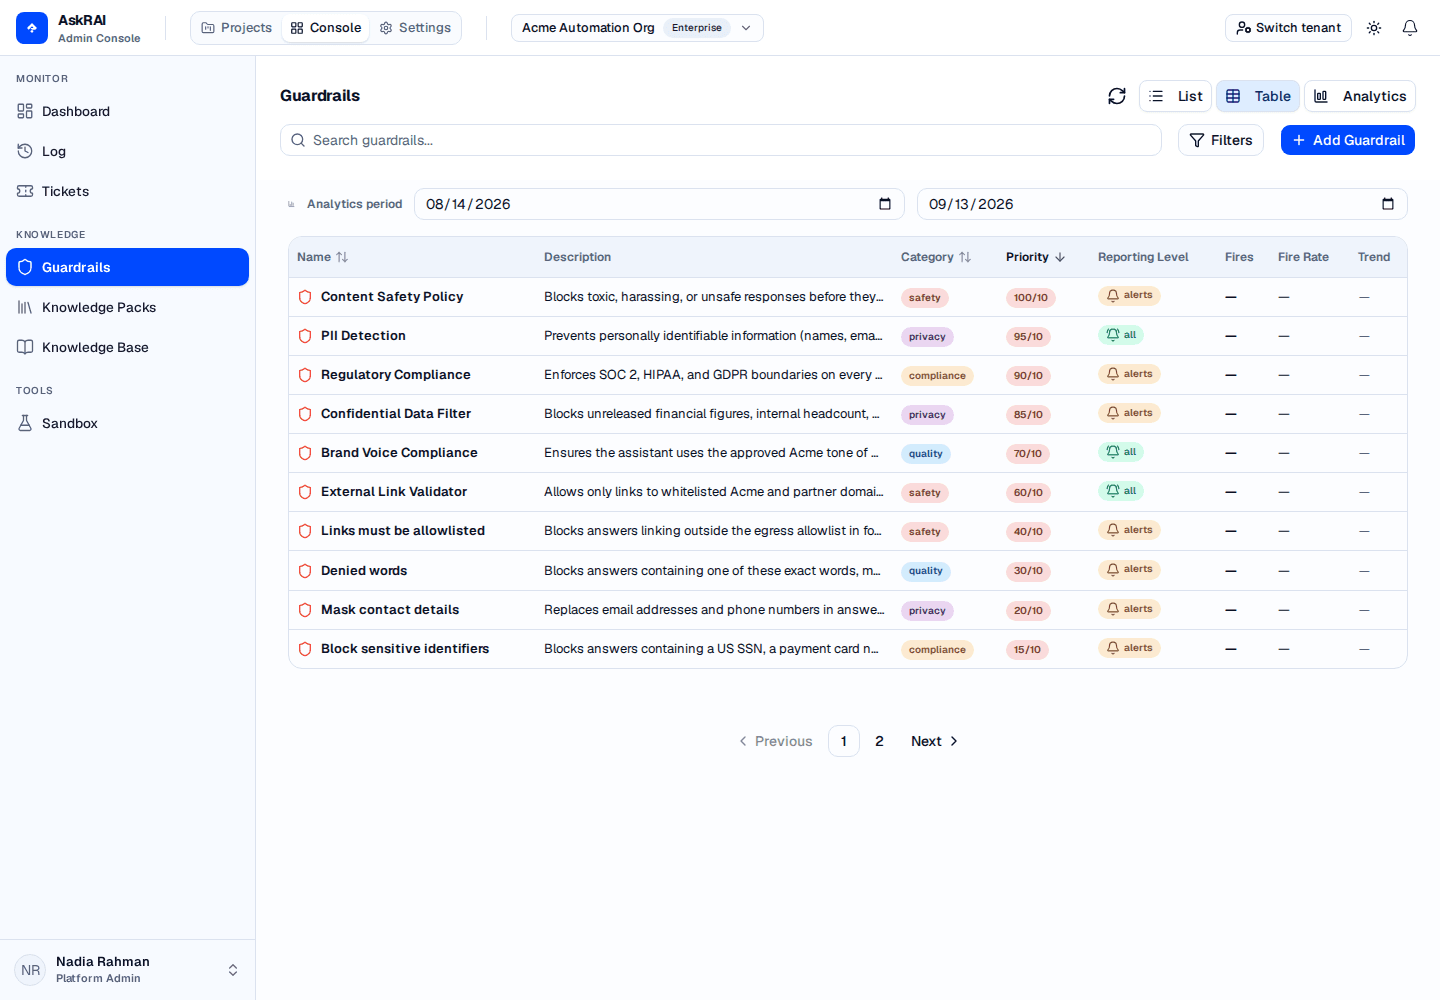
Table view sorts on Name, Category and Priority only — Description, Fires, Fire Rate and Trend carry no sort control. Note the pager: the list is ten guardrails to a page.
Guardrails are listed highest-priority first by default. Sorting, filtering and paging are all done by the server, so the sort applies to the whole set rather than to the page you are looking at.
The card (List) view relabels the category badge: compliance shows as Regulatory, quality as Behavioral, privacy as Legal, and custom as Procedural. The underlying names are what you see in the editor, the filter dropdown, and Table view.
Filter the list from the toolbar:
- Search — case-insensitive substring match across the name, description and prompt fields.
- Category — Safety, Compliance, Quality, Privacy, or Custom.
- Priority — a band: High (8–10), Medium (5–7), or Low (1–4).
- Reporting level — None, Alerts or All. This is stored metadata that no longer has an editor control and does not affect what is audited (see below); the filter is here because the value is still recorded and still shown in Table view.
Active filters appear as removable chips below the toolbar. Clear All lives inside the Filters popover, not next to the chips.
The priority scale is not coherent across the product. The filter bands and the editor dropdown both assume 1–10, but priority is an unbounded integer on the API and real guardrails carry values well outside it — the shipped and seeded examples run from 5 to 100. Two consequences: the Table view priority chip always renders the value out of ten, so it shows readings such as 60/10 and 100/10, as in the screenshot above; and a guardrail whose priority sits outside 1–10 matches no band, so every priority filter hides it. Filter by category or search by name instead.
Creating a guardrail
Add Guardrail navigates to Settings → Guardrails, where authoring happens. That is the only surface carrying kind, stage, action and status — the four fields that decide whether a guardrail does anything at all — so a guardrail cannot be created from this page.
The button is shown only to Platform Admin, because that is what the Settings route is gated on. This page itself is not gated, so a reader who may review guardrails but not author them sees the list without the button rather than a button that only reaches a denial.
Once the guardrail exists, come back here to set its category and priority, and to watch it perform.
Editing a guardrail
Click any guardrail card or table row to open the editor. Name and description are edited in place from the header; category, priority and — for an LLM judge — the prompt are below.
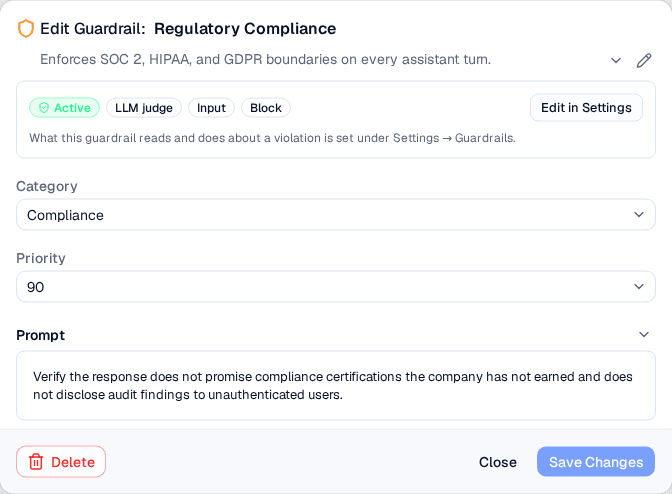
The strip at the top is what this guardrail does at runtime — status, kind, stage and action — none of which this editor can change. It is shown because the fields beneath it read as the whole of a guardrail without it.
The Prompt field appears only for an LLM judge, and Save Changes is held until it has one: a judge with an empty prompt asks the model nothing. Every other kind is refused by the server for carrying a prompt at all, so no prompt is offered for them.
Priority never holds Save. A guardrail already carrying a value outside 1–10 has that value offered as its own option in the dropdown, so renaming a guardrail does not silently rewrite its priority.
Saving applies from the next turn onward, including turns in conversations already under way, and is in force everywhere within five minutes at the outside.
Platform guardrails
Guardrails that ship with AskRAI are read-only on both pages — an edit or a delete is refused. Neither List nor Table view marks them: the Platform badge appears once you open one, alongside the notice that it cannot be changed.
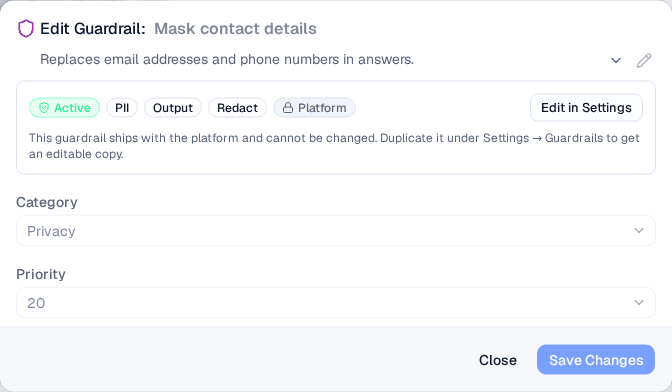
Every control is disabled and Delete is absent — the editor says so rather than letting you reach a permission error. To change one, duplicate it under Settings → Guardrails to get an editable copy.
Deleting a guardrail
Open the guardrail and click Delete at the bottom-left of the editor, then confirm. Deletion is permanent. Platform guardrails have no Delete control.
Field reference
| Field | Description | Required | Values |
|---|---|---|---|
| Name | Display name shown in the list | Yes | Free text |
| Description | Narrative explanation of the guardrail's purpose | No | Free text |
| Category | Classification used for filtering and the analytics breakdown. Carries no runtime meaning | No — defaults to Custom | Safety, Compliance, Quality, Privacy, Custom |
| Priority | Evaluation order, lowest first, and which blocker is reported as the reason | No | The dropdown offers 1–10; an existing value outside that range is preserved and offered |
| Prompt | The rule an LLM judge puts to the model | Only for an LLM judge, and then Save is held without it | Free text |
Analytics
Switch to the Analytics view to see guardrail performance over a configurable date range. That view has its own date picker (with 30d/60d/90d presets) and a Channel filter, separate from the Analytics period picker used by List and Table view. The Analytics picker allows up to 90 days; the List/Table picker is limited to a 30-day span. In both, a wider selection is silently clamped — and the fire-rate API backing the List/Table fire badges rejects ranges over 30 days.
- Compliance trend — the share of blocking guardrail evaluations that passed. Warn and Redact results are left out: they found something and let the turn through, so how often those fire is what the fire count and the Top Triggered chart show instead. It counts evaluations rather than conversations, so a message screened by three guardrails contributes three results.
- Category distribution — fires broken down by category.
- Top Triggered Guardrails — guardrails ranked by fire count, not by priority. Each bar's label also carries that guardrail's fire rate and, where one exists, its false-positive rate — the share of its fires later marked as false positives in the conversation logs. There is no separate false-positive chart. Clicking a bar opens that guardrail's editor, but only when the guardrail is on the page of the list currently loaded — the list is ten to a page, so for anything further down, page to it in List or Table view first.
In List view each card shows a fire badge with the total for the selected range, and beneath it the fire rate as a percentage of conversations plus a sparkline. The badge colour reflects the rate: green below 15%, orange from 15% up to 50%, red at 50% or more. Table view shows the same numbers as plain columns.
Troubleshooting
| Symptom | Cause |
|---|---|
| A guardrail never fires, however it is written | Nothing lists it. Attach it to a group, an agent, or a policy — or its status is draft, which is set in Settings. |
| A guardrail does not appear under any priority filter | Its priority is outside 1–10, which matches no band. Filter by category or search by name. |
| Save Changes stays disabled | The name is empty, or it is an LLM judge with no prompt. |
| Add Guardrail is not shown | The account is not a Platform Admin, which the authoring route requires. |
| Editing a platform guardrail is refused | Platform rows are read-only. Duplicate one under Settings → Guardrails. |
The priority chip in Table view reads 100/10 | The chip always renders out of ten, and priority is unbounded. The stored value is the number before the slash. |
Related pages
- Guardrails (concept) — kind, stage and action, and how an evaluation runs
- Settings → Guardrails — author a guardrail and set what it does
- Policies — attach a set of guardrails, and ceilings, to a group or an agent
- Users, Roles & Groups — attach guardrails to a group
- Conversation Logs — review evaluation results and mark false positives