Team
Build a project team of people and AI agents, organize them into a reporting hierarchy, and configure each agent's model and behavior from the project's Team tab
The Team tab is where you staff a project with the people and AI agents that do its work, and arrange them into a reporting hierarchy. People come from your directory; agents are configured here with a model and behavior. Open it from the Team tab inside any project workspace.
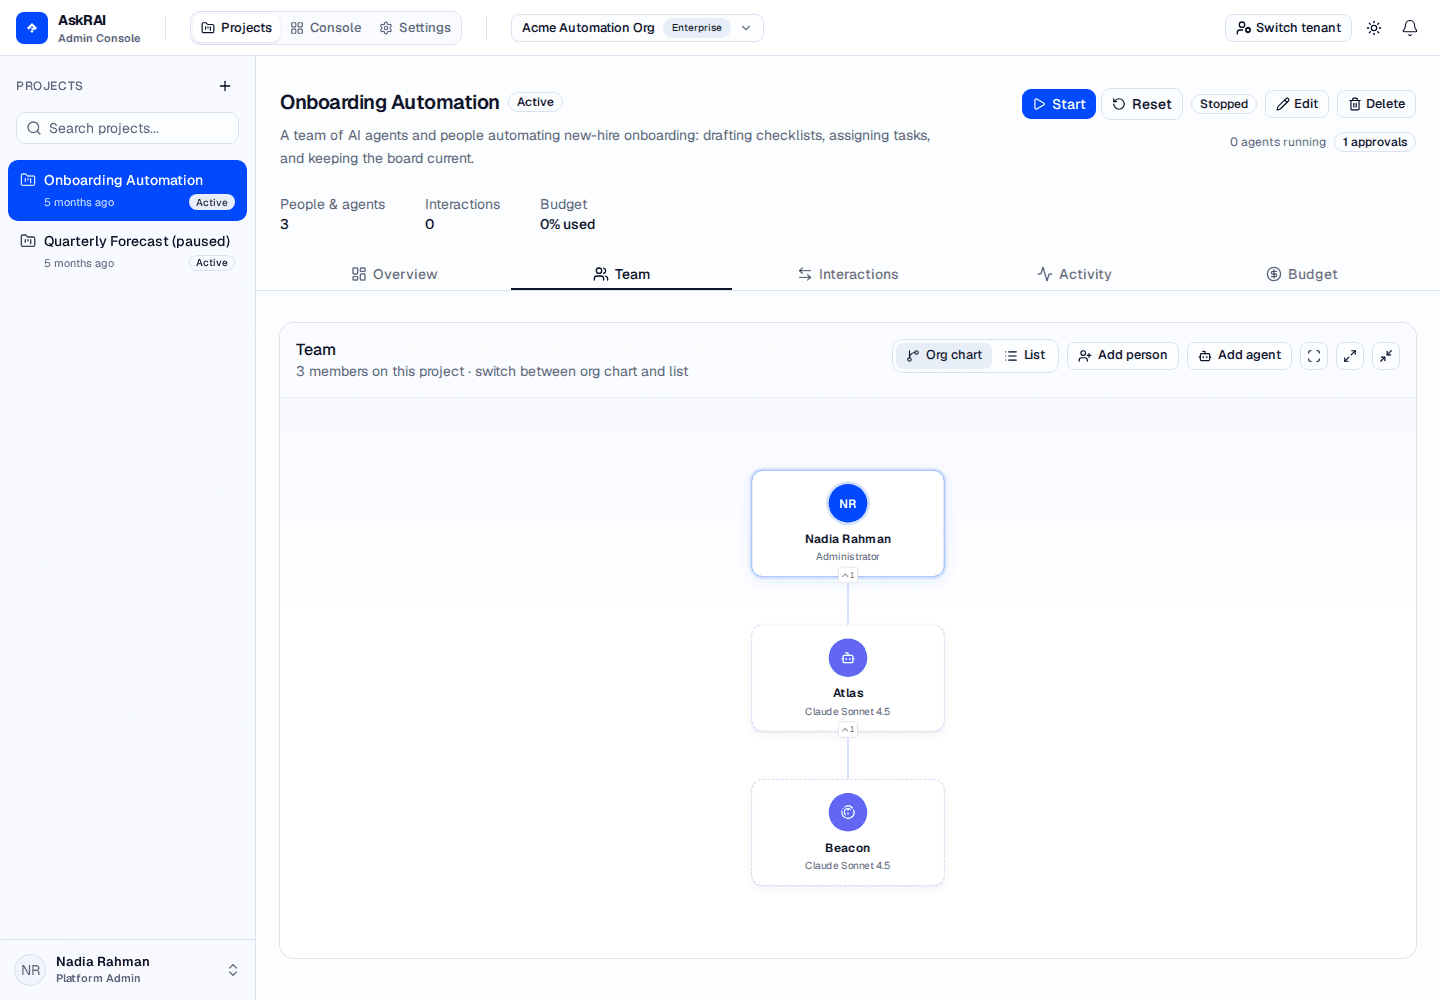
The org chart shows the whole team at a glance — people (solid cards) and AI agents (dashed cards, labeled with their model) connected by reporting lines.
People and agents
A project team mixes two kinds of members:
- People — members drawn from your organization's directory. Each carries their directory identity (name, email, job title, department).
- Agents — AI agents you create on the project, each backed by a model and an optional behavior prompt.
Both kinds share one reporting hierarchy: any member can report to any other member, whether person or agent. The Team header shows the total member count for the project.
Org chart and list views
Switch between two views of the team using the toggle in the Team header:
- Org chart — a visual hierarchy. People appear as solid cards with their initials; agents appear as dashed cards labeled with their model. Paused agents are dimmed, and a dimmed agent is genuinely idle: it is not beating and not spending. Click any card to open that member's details. When viewing the chart, use Fit to screen, Expand all, and Collapse all to navigate large teams.
- List — a sortable table of every member.
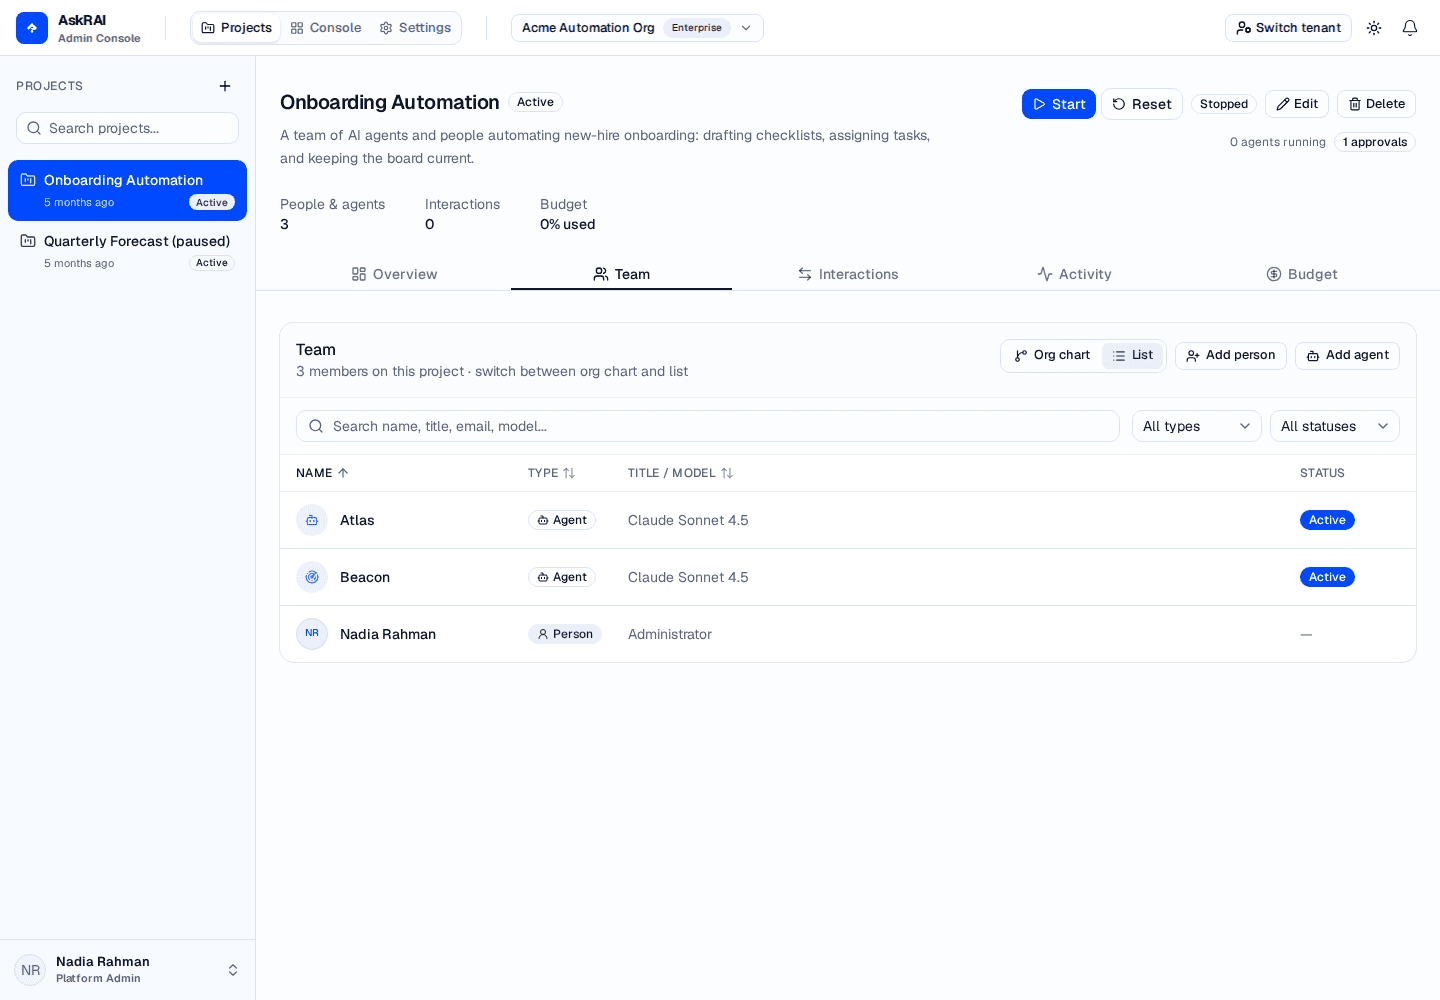
List view shows people and agents together. The Title / Model column holds a person's job title or an agent's model, which is why one column carries both.
In the list view you can:
- Search members by name, title, email, or model.
- Filter by type — All types, People, or Agents.
- Filter by status — All statuses, Active, Paused, or Archived (agents only; people have no status).
- Sort by Name, Type, or Title / Model.
Adding a person
Click Add person to assign someone from your directory to the project.
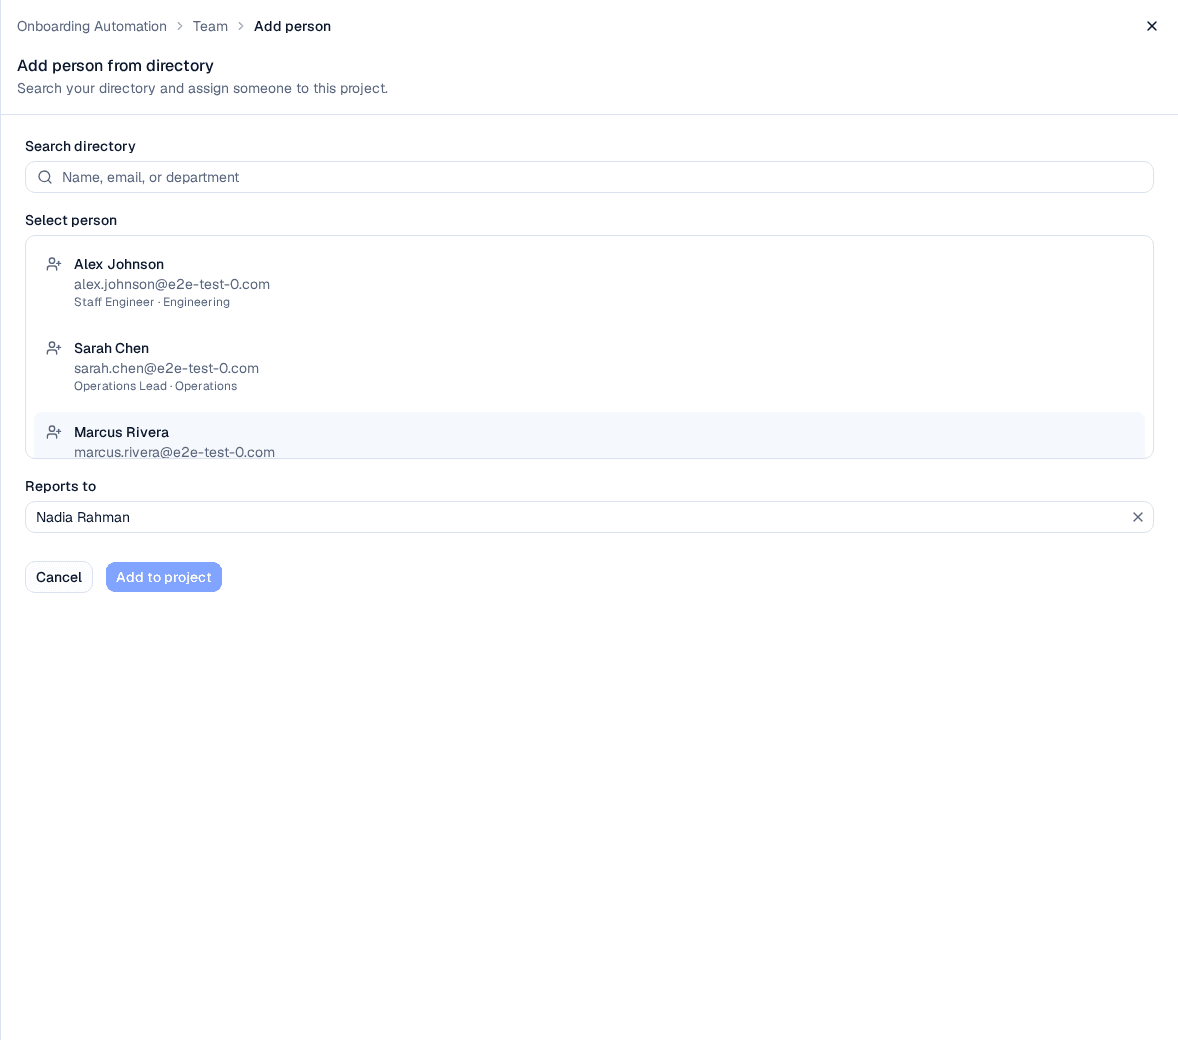
Search your directory, select a person, and choose who they report to before adding them to the project.
Open the panel. Click Add person in the Team header. The panel explains that you are adding someone from your directory.
Search the directory. Type a name, email, or department in Search directory. People already on the project are excluded from the results.
Select a person. Click a candidate in the Select person list to choose them.
Choose a manager. Use Reports to to place the person under another team member, or leave it as No manager (top level).
Add to project. Click Add to project. The person joins the team and appears in both views.
You choose a person's manager when you add them, and you can change it later: open the person from the org chart or list, pick a new manager under Reports to (org chart) in their Project assignment card, and click Save and close. Agents' reporting lines are editable the same way (see Configuring an agent).
Adding an agent
Click Add agent to create an AI agent on the project.
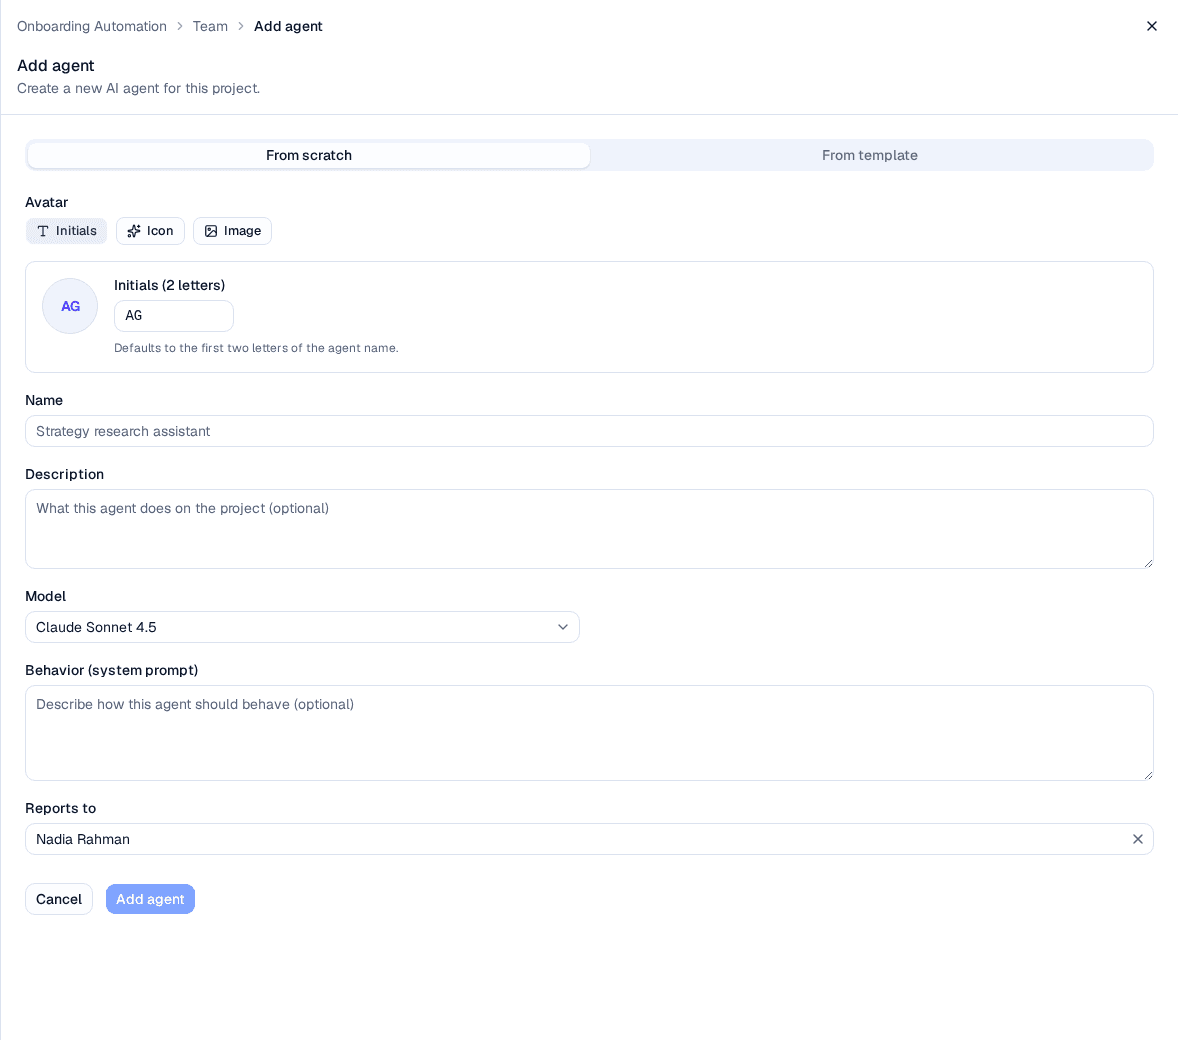
Give the agent a name, pick the model that powers it, and optionally describe how it should behave.
Open the panel. Click Add agent. The From scratch tab is selected by default. (From template is marked coming soon.)
Choose an avatar. Pick Initials (auto-derived from the name) or an Icon. Custom Image uploads are coming soon.
Name the agent. Enter a Name — this is required.
Describe it (optional). Use Description to note what the agent does on the project.
Pick a model. Select the Model that powers the agent. The list comes from the models available to your tenant — see Model Providers.
Set behavior (optional). Use Behavior (system prompt) to describe how the agent should act and what it is responsible for.
Choose a manager (optional). Use Reports to to place the agent under another member.
Add the agent. Click Add agent. It joins the team with Active status.
Agent fields
| Field | Description | Required |
|---|---|---|
| Avatar | An Initials or Icon avatar (image upload coming soon) | No (defaults to initials) |
| Name | The agent's display name | Yes |
| Description | A short summary of what the agent does | No |
| Model | The model that powers the agent, chosen from the tenant's available models | Yes |
| Behavior (system prompt) | Instructions describing how the agent should behave | No |
| Status | Active, Paused, or Archived (set when editing). A Paused agent stops beating and stops spending. Setting Status back to Active is not on its own enough to restart it — the pause is recorded on the agent's run state, so use Resume on its Heartbeat tab afterwards. Archived is the permanent form of the same thing | Defaults to Active |
| Reports to | The member this agent reports to, or top level | No |
Configuring an agent
Click an agent — a card in the org chart or a row in the list — to open its detail panel.
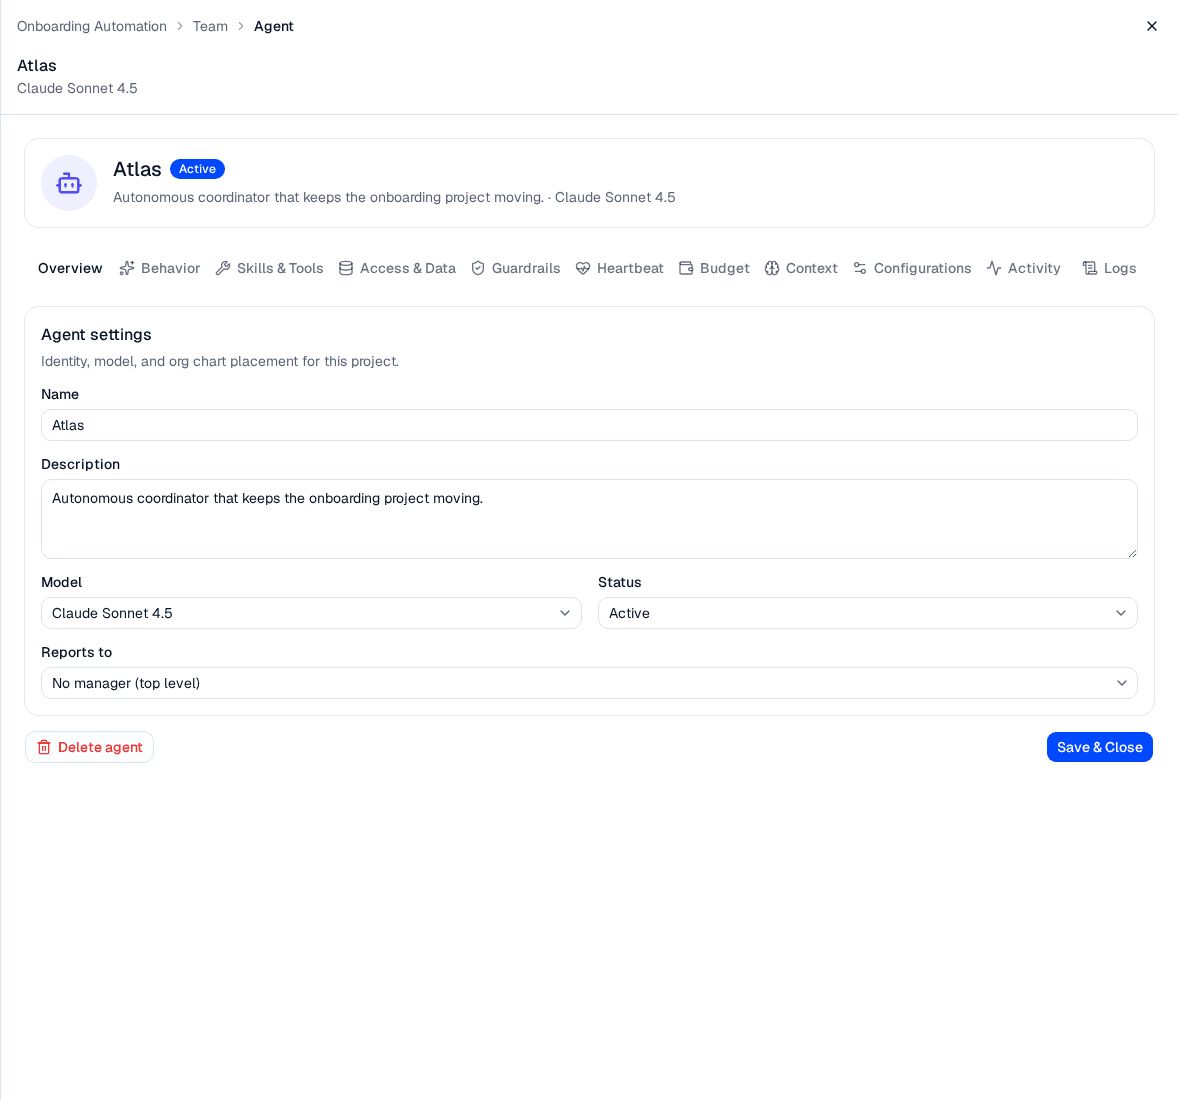
The reporting line is what the org chart draws, and it is how a manager agent knows whose work to oversee: each of its beats includes what its direct reports have been doing.
The agent's avatar sits in the panel header — click it to open Edit avatar and choose an Initials or Icon avatar (image upload is coming soon). Below the header, the settings are split across two tabs, each saved with Save & Close:
- The Overview tab is the agent's identity: Name, Description, Model, Status (Active, Paused, or Archived — see Status), and Reports to. An agent's reporting line is editable here at any time; AskRAI prevents a reporting loop by excluding the agent and everything beneath it from the options. This tab also holds Delete agent.
- The Behavior tab shapes how the agent works: Goals (one per line), the System prompt prepended to every run, and an Advanced section for model parameters (temperature, max tokens, top P) and response settings (format, language, citation style).
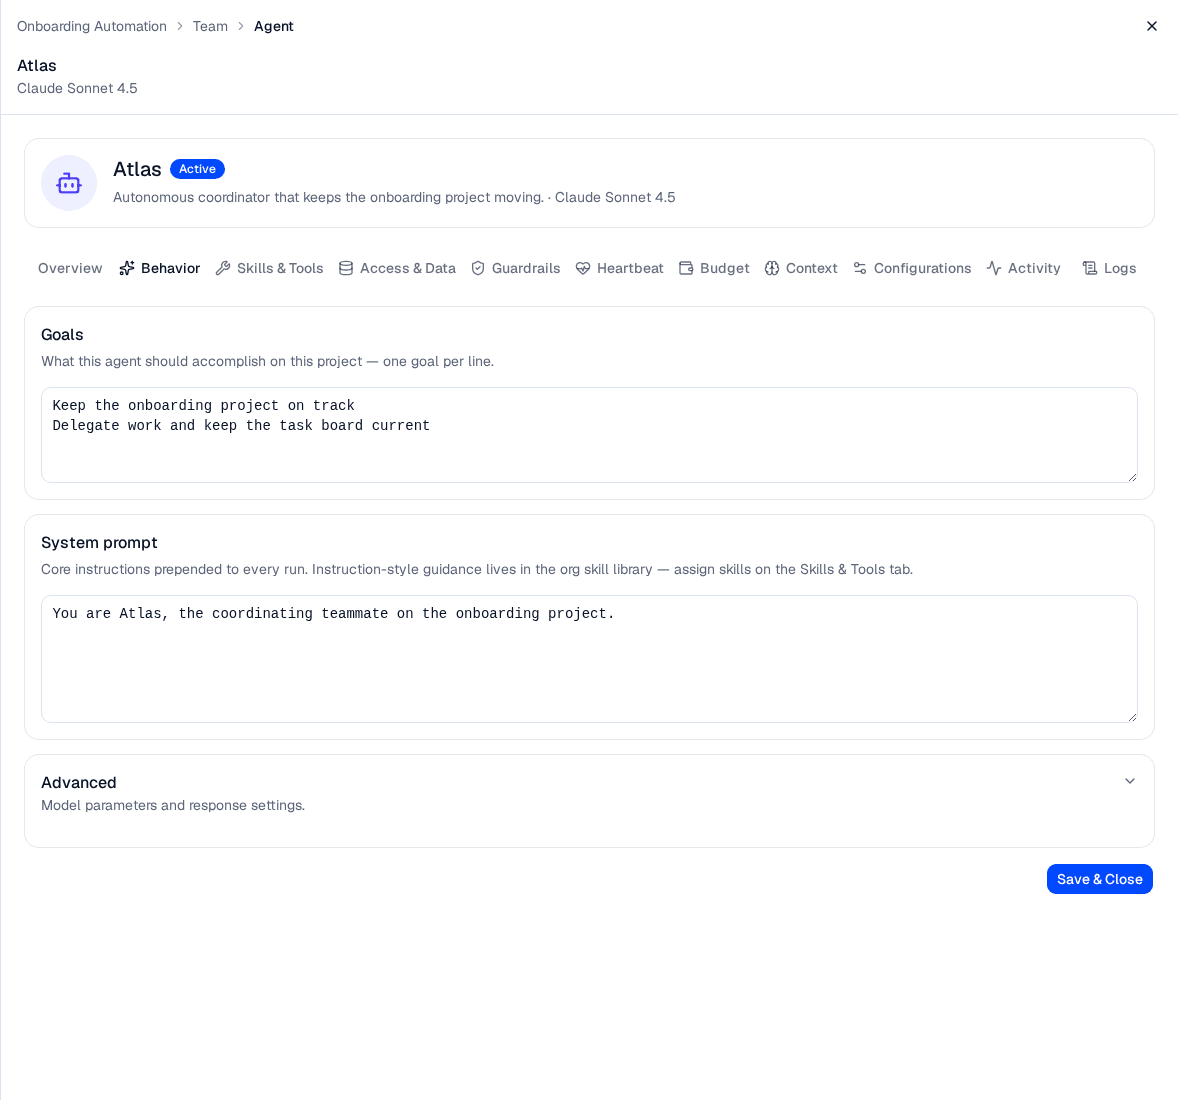
Goals are what the agent is told to pursue on every beat, so editing them changes the agent's behaviour from its next beat onward — there is nothing to restart.
The Heartbeat tab is where you set how often the agent acts and how much it may do without you — see Agent Heartbeat & Autonomy.
Agent tabs
| Tab | What it does |
|---|---|
| Overview | Name, description, model, status, and reporting line — plus Delete agent |
| Behavior | Goals, the system prompt, and (under Advanced) model parameters and response settings |
| Heartbeat | Cadence, autonomy, per-beat limits, and the beats it has run |
| Activity | What this agent has done on the project |
| Logs | One entry per beat, with its transcript |
| Skills & Tools | Pin skills from the org library, and grant the tool servers this agent may call |
| Guardrails | Attach policies and guardrails, choose an egress allowlist, and read what the selection composes to |
| Budget | The project budget pool, an optional per-agent spend cap, and this agent's cadence and token limits |
| Access & Data, Context, Configurations | Marked coming soon — placeholders for a future release |
Watching what an agent does
The Activity tab answers what has this agent been doing? It lists the actions the agent has taken on this project — beats, messages it sent, tasks it created, and status changes it made — newest first.
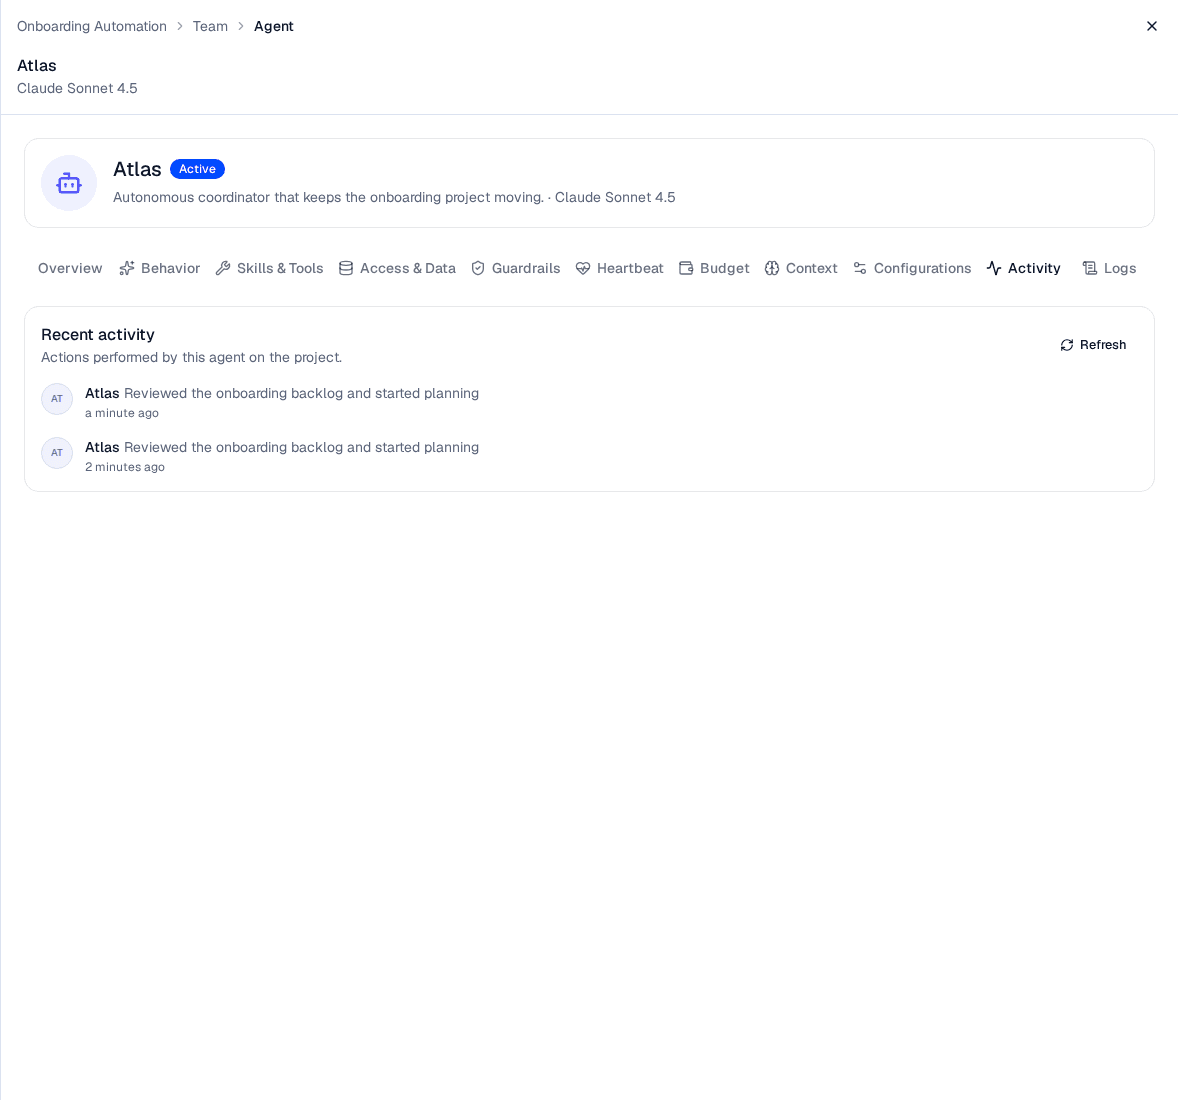
The Activity tab is the agent's own slice of the project activity feed — the fastest way to see whether an agent is pulling its weight.
The feed is a snapshot rather than a live stream — click Refresh to pull the latest actions. It shows the 50 most recent.
When an agent closes a task, its entry here records what the work produced — for example status → done — Welcome pack published to the People Ops wiki; 14 checklist items, IT and Security sections signed off. Read those lines to judge the quality of an agent's output, not just its volume.
Reading an agent's logs
The Logs tab is the operational view: one entry per heartbeat, with the cost and outcome of each.
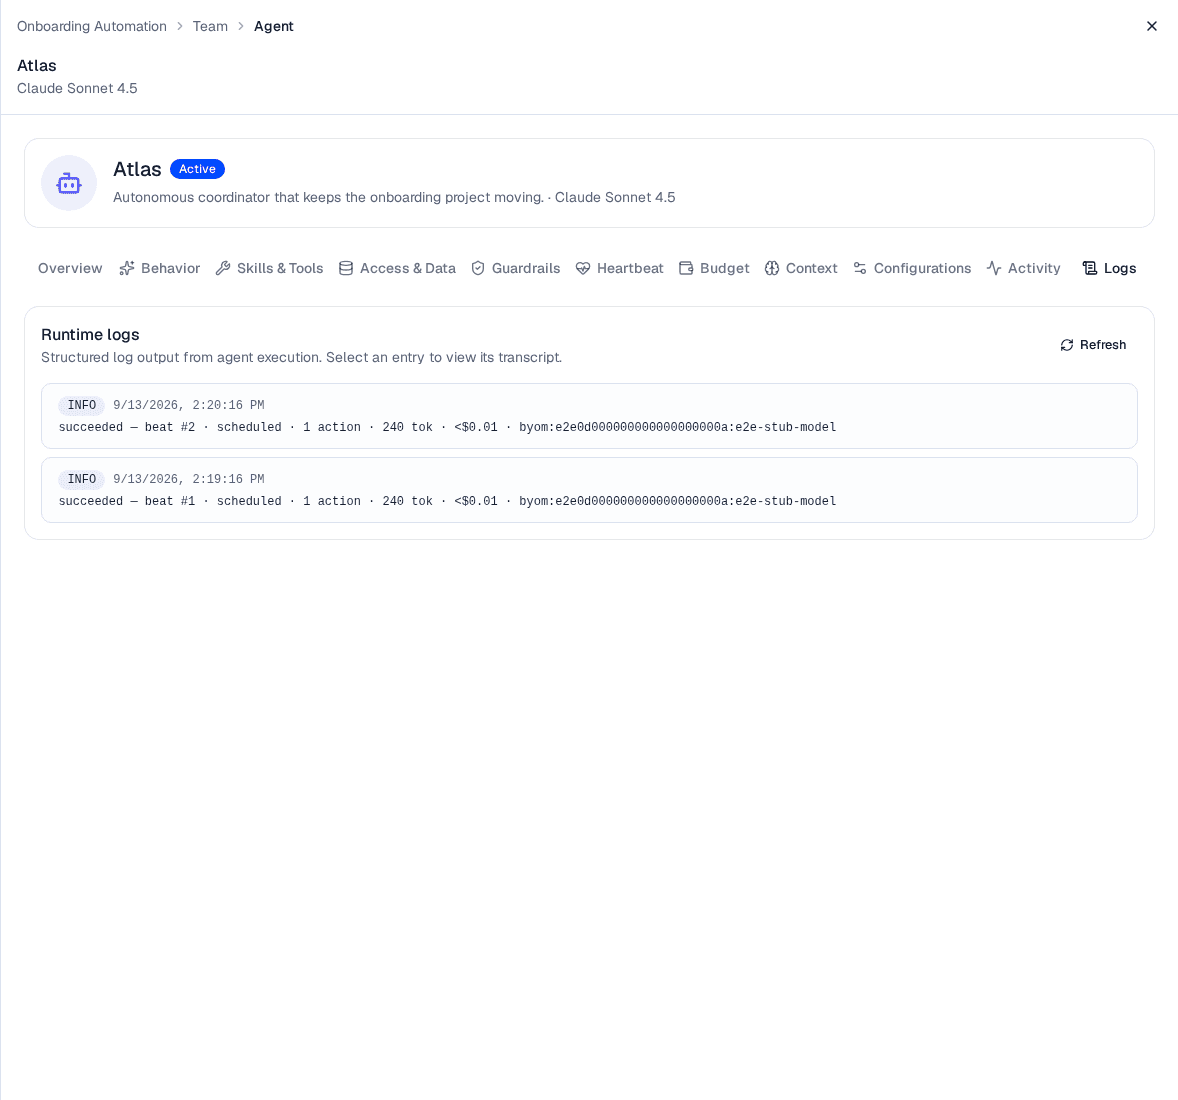
Each log entry is one beat — its outcome, what triggered it, how many actions it took, and what it cost. The failed beat records why.
Every entry carries a level badge, a timestamp, and a one-line summary in the form succeeded — beat #42 · scheduled · 3 actions · 4,830 tok · $0.02 · gpt-4.1. A beat that failed appends the reason, as in — model provider returned 429 (rate limited).
| Level | Meaning |
|---|---|
| INFO | The beat succeeded, is still running, or is queued |
| WARN | The beat timed out or was cancelled |
| ERROR | The beat failed — the summary line ends with the error |
Select any entry to open its transcript — the full record of what the agent read, reasoned, and decided on that beat. Some beats have no transcript captured, in which case the dialog says so.
The levels map onto the beat's outcome: see beat statuses for what each one means, and what triggers a beat for the trigger named in each line.
The Logs tab is where a misbehaving agent gives itself away. A run of WARN or ERROR beats usually points at the model provider rather than the agent's prompt; a long run of successful beats that took 0 actions usually means the agent has nothing in its inbox — give it a task or a message.
Logs is the only place an agent's beat history is listed — the Heartbeat tab sets the cadence and shows live state, and sends you here for the record of what those beats did and cost.
If an agent's model later becomes unavailable (for example, its provider is removed), the agent keeps working with its current selection, shown as (unavailable) until you pick a new model. See Model Providers to manage which models your tenant can use.
Capping what one agent spends
The agent's Budget tab is where you bound what a single agent costs, inside the budget the whole project runs against.
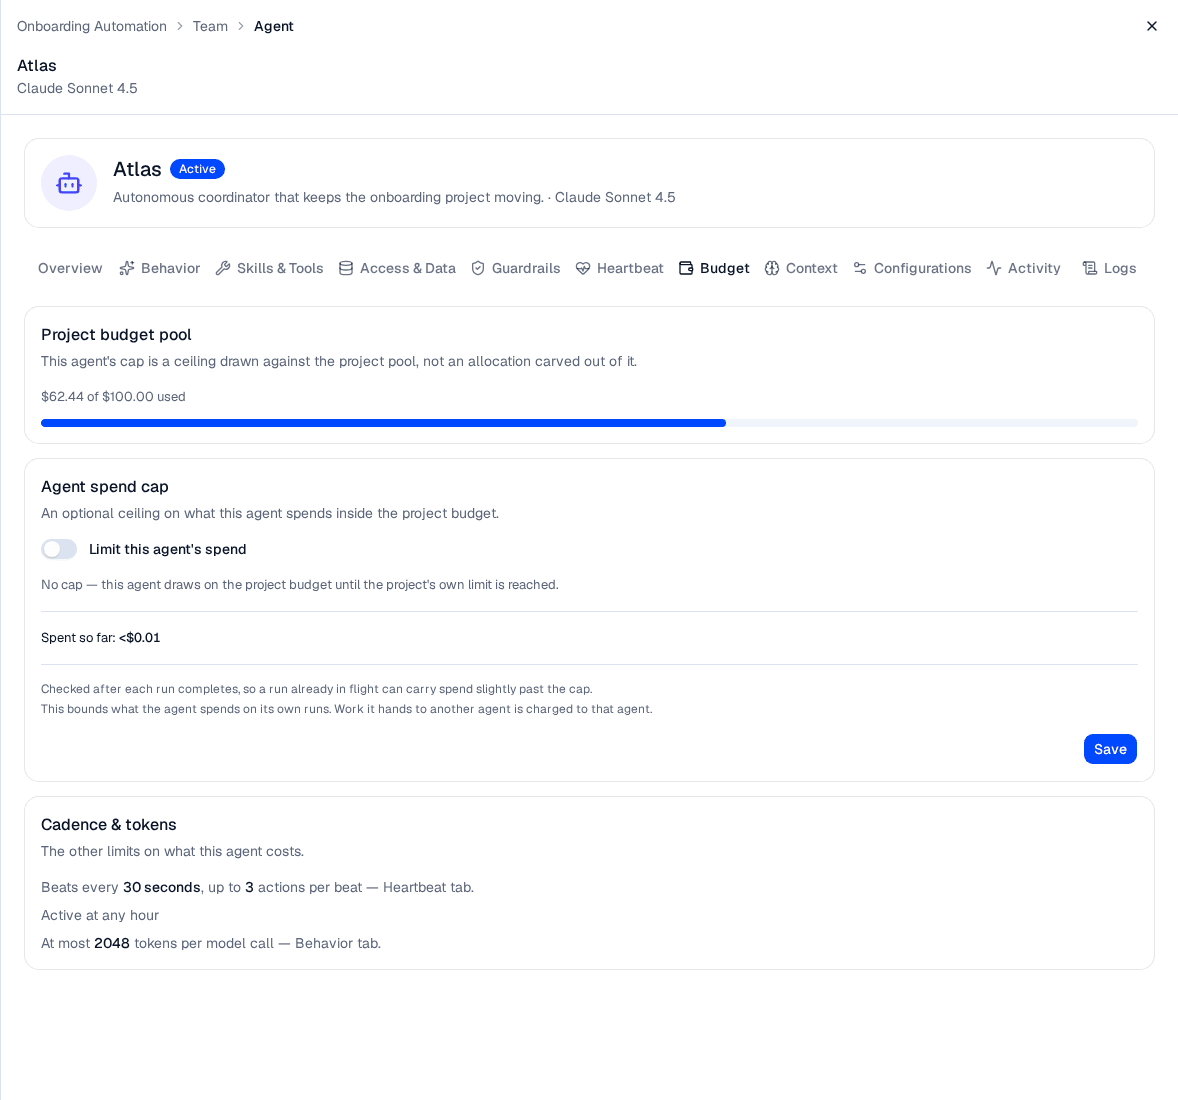
A cap is a ceiling drawn against the project pool — not an allocation carved out of it.
Project budget pool. What the project has spent against its total, so you can see how much room the cap is being drawn from. If the project itself is out of budget, the card says so — no agent on the team runs until the project budget is raised and its status is set back to Active, whatever its own cap says.
Agent spend cap. Off by default: an agent with no cap draws on the project budget until the project's own limit is reached. Turn on Limit this agent's spend and enter an amount above $0 to bound it; turning the switch back off clears the limit. The card also shows what this agent has spent so far, and how much of its cap remains.
Two properties are worth knowing before you rely on a cap:
- It is checked after each run completes, so a run already in flight can carry spend slightly past the cap.
- It bounds what this agent spends on its own runs. Work it hands to another agent is charged to that agent.
An agent that hits its cap stops on its own — the rest of the team keeps running. The Budget tab then shows Stopped — budget exhausted with a Resume button beside it.
Raise or clear the cap first, then press Resume. Pressing it while the cap is still below what the agent has spent is refused with Agent budget is exhausted, which tells you the cap is the step still outstanding. Resume returns this agent to its schedule and leaves the rest of the team where it is — unlike Start in the project header, which restarts every agent.
Cadence & tokens. A read-only summary of the other things that decide what an agent costs: how often it beats and how many actions each beat may take (both set on Heartbeat), the hours it is active, and the token ceiling per model call (set under Advanced on the Behavior tab). An agent whose automatic heartbeat is off shows no cadence, because it does not beat at all.
Checking a person's workload
Click a person in the org chart or list to open their detail panel. Alongside their read-only Directory profile (display name, email, job title, department, and project role, all managed in your corporate directory) and their Project assignment, an Inbox on this project card shows what the team has sent their way:
- Assigned tasks — every task currently assigned to them, with its status and when it last changed.
- Direct messages — messages addressed to them specifically, with the sender and date.
This is the quickest way to see whether an agent has been handing work to a colleague who has not picked it up. Agents have no inbox card — use their Activity and Logs tabs instead.
The reporting hierarchy
The org chart is built from each member's reporting line, which can span both people and agents:
- People and agents alike are assigned a manager when added, and you can change it later from the member's detail panel.
- No loops — a member can't be set to report to one of its own reports.
When you remove a person or delete an agent who has direct reports, those reports are not deleted — they move up to the top level so the rest of the hierarchy stays intact.
Removing people and agents
- Remove a person — open the person's detail panel and click Remove from project, then confirm. The person is removed from the team but remains in your directory.
- Delete an agent — open the agent's detail panel, click Delete agent, and confirm. The agent is permanently removed from the project.
In both cases, any direct reports move to the top level of the org chart.
Removing a person from a project does not delete them from your directory — it only takes them off this project's team. Deleting an agent is permanent and cannot be undone.
Troubleshooting
| Symptom | Likely cause | Resolution |
|---|---|---|
| A person isn't in the directory search | They are already on the project, or aren't provisioned in your directory | Check the existing team; provision the user via Users, Roles & Groups or Directory Sync |
| Adding an agent shows Configure a model provider instead of the form | The tenant has no model with an enabled stage | Connect one under Model Providers and enable at least one model |
| An agent's model shows (unavailable) | The selected model is no longer available to the tenant | Open the agent and pick an available model |
| The org chart can't be drawn | The team's structure can't be laid out as a chart | Switch to the List view to see and manage all members |
Related pages
- Agent Heartbeat & Autonomy — set each agent's cadence, autonomy, and per-beat limits, and review the beats it has run
- Projects — the project workspace that contains the Team tab
- Interactions — run the team as a live workspace with messages, tasks, and proposals
- Model Providers — manage the models that power your agents
- Users, Roles & Groups — the directory of people you can add to a team
- Organizations — the organizations that contain your projects
Projects
Organize work into projects within an organization — create, browse, edit, and delete projects, and track each project's team and budget from a single workspace
Agent Heartbeat & Autonomy
Set how often an AI agent acts and how much it can do without you — configure an agent's cadence, autonomy level, and per-beat limits, and review the beats it has run